Simple Pan Seared Duck Breast
Seared duck has one of those reputations of being a food you can only order in restaurants unless you live in the country. Which is completely inaccurate. You’re really just short-changing yourself out of some really delicious duck.
Jump to RecipeAnd I promise it’s not hard to make at all. Essentially seared duck is just duck cooked in its own fat. You can do that on your own and have a restaurant-level meal at home in about 30 minutes! It’s simple enough that we usually make it at 8pm on a weeknight after the gym. So duck isn’t that hard. But it can double as a fancy weekend treat just as well! I love cooking duck because it’s fairly quick and I can sip a glass of wine while I cook.
Duck is also very flavorful too! Which means you don’t need to go buy a bunch of ingredients and spice it with exotic things to make it taste good. This recipe shows you exactly how to serve a week-night duck breast with ingredients you already have in your pantry. (I promise.)
Yes, actually in-your-pantry ingredients. Not one of those “ingredients in your pantry” lists that you read and see “tarragon”-and-you-vaguely-remember-that-name-and-may-have-bought-it-once-but-have-no-idea-why-or-what-for-or-if-you-still-have-it-and-oh-look-no-you-don’t-so-you-spend-all-day-googling-substitutes kind of ingredients.
All you need is some salt, pepper, and the duck.
I’ve included a Red Wine Reduction sauce as well. It’s also fairly simple and can look very pretty drizzled on top to dress things up. But it’s totally unnecessary. (We had a bottle of red wine we really hate still sitting on the counter. So I figured I’d better try to use some of it up.) You’ll have a fancy, flavorful meal with just the duck alone.

Tips for Cooking with Duck:
Let the duck warm up before you cook it.
This is especially true if you’re making a medium-rare or rare duck. It won’t be in the pan as long and you run the risk of burning the exterior while trying to heat the middle. That’s too much stress for one duck breast.
The one downside with warming the duck up first is the fat and skin will soften a bit, making it hard to score. To solve: take the duck out of the fridge. Wash and dry it. Score it immediately while the skin and fat are still cool from the fridge. Then let it sit out on the counter for 30 minutes to warm up.
Use a cold pan.
Most seared meats require a very hot pan to instantly create a crust on your meat. Don’t do that with duck. The reason? As I mentioned, duck is very very fatty. You want to slowly render all that fat out of the duck and into the pan.
Plopping a duck down into a hot pan will cause all the muscles to contract. You’ll end up with a beautifully seared crust…with all that fat still trapped inside. (Also a very poofy duck, which is harder to cook through.)

Cook it slowly over medium-low heat.
Slow cooking is also very key with duck, for essentially the same reason you use a cold pan. Too fast? You’ll just sear it with all the fat still there and end up burning the duck. Slow heat will gently remove the fat, give you nice crispy skin, and keep the moisture in the duck without seizing the muscles.
- Use Medium-low heat for the skin.
- Use Medium heat for the flesh if you want to speed things up.
Don’t use extra fat.
One of the big plus sides of duck (or downsides if you look at it another way) is the high fat content. Duck is one of the fattiest poultry meats out there. Rivaled only by goose. While this adds extra flavor and richness, all the extra fat can make duck overwhelming. Especially if you cook it in butter.
Once as a kid I requested a roast duck for Christmas. On attempt number one, we made it just like a turkey- rubbed it in butter… Let’s just say it was very rich. And it was something of a struggle to taste anything other than gooey fat the rest of that night.
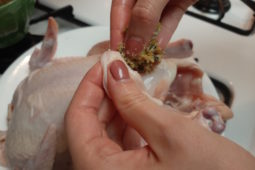
Score the skin.
If my parents and I had known this trick before the Great Christmas Eve Duck Fiasco of 2003, things might have gone better. In many roasted game birds, you don’t want to prick them too much because you’re trying to keep the juices and moisture in. But with duck, you want the opposite- to let some of that fat out. This adds great flavor to the skin without reducing flavor in the meat. And cuts down on some of that strong fat when you tuck into your plate.
If you’re roasting a whole duck, scoring the skin it is a good idea. But if that’s too much work, at least prick the skin all over.
If you’re pan searing a duck breast, you absolutely should score the duck skin.
How to Score a Duck Breast:
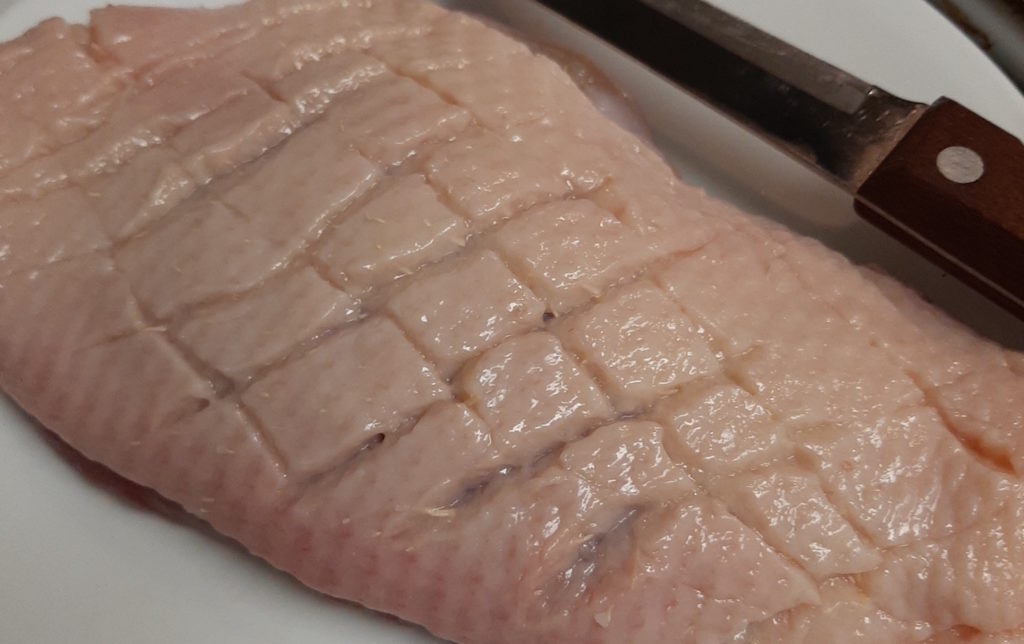
- Lay your duck on a cutting board, skin side up.
- Get out a sharp knife. If necessary, get out a knife sharpener to sharpen said knife.
- Place your knife diagonally against the duck skin and cut diagonally along the skin from one end to the other.
- Note: Don’t cut too deeply. You want to cut through most of the fat, but not all the way through. And definitely not into the meat! Cut gently and be careful. It’s not the end of the world if you miss. But you do want to try to keep the meat moist.
- Move the knife about ¼ to ½ inch away from the first cut. Cut again. Repeat down the whole side of the duck skin.
- Now turn your duck around and repeat the process in cuts perpendicular to your first set.
- If you created a diamond pattern across all the skin, that’s correct!
Start cooking the duck skin-side down.
As with all the points above, you’re trying to render out the fat of the duck. Nice and slow until you have a crisp crust. And where is most of that fat? In the duck’s skin. So that’s where you start. Your scoring above will help the fat flow out smoothly and quickly. And the checked pattern looks quite pretty when it’s brown and crispy.
Drain the rendered fat as you go.
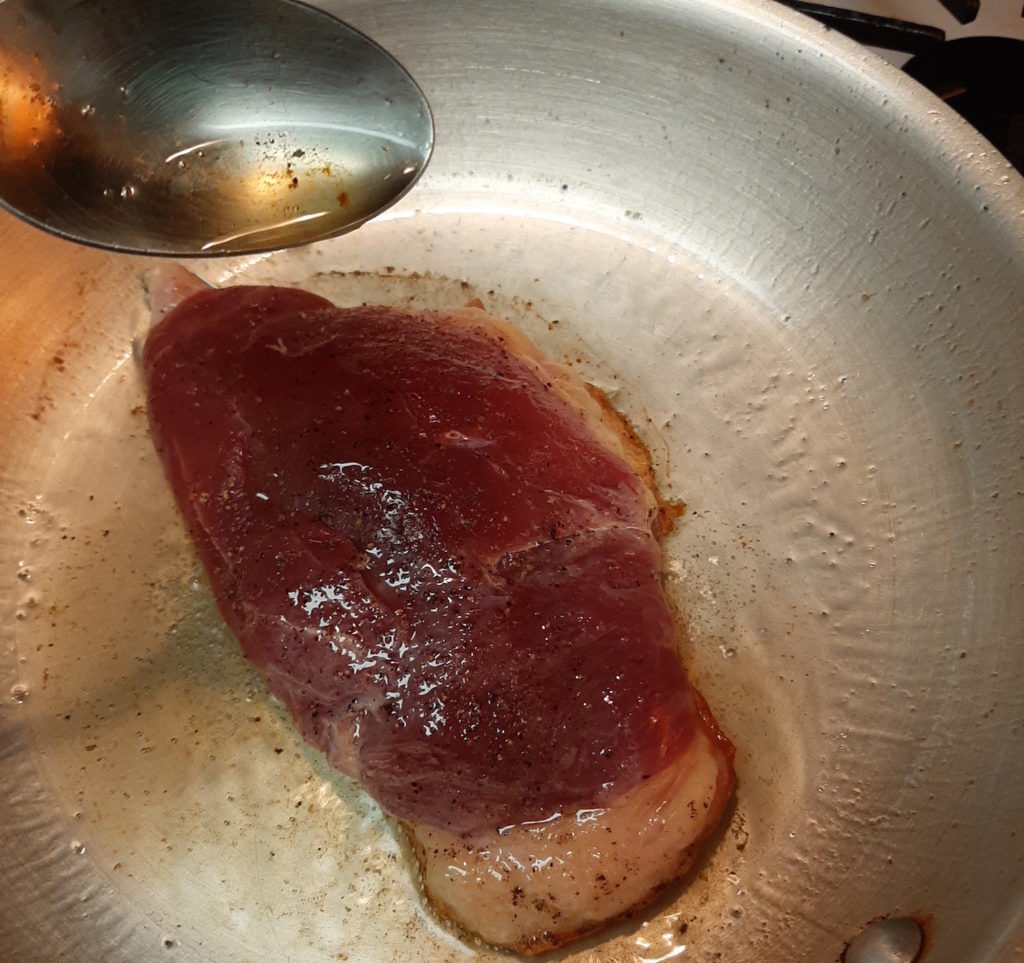
Lift your pan up. Carry it to the sink. (Hold on to that duck.) And pour it into your fat-can. (You have a fat-can by the sink, right? You should.) This will keep the fat from burning. And from overwhelming your whole pan and dinner with fat. Cooking duck in a little of its own fat is tasty. Flash frying your duck in its own fat is…gross.
Duck F.A.Q.:
Why is duck so fatty? Why is duck meat red?
I’m combining these two questions because the science behind them is the same. Ducks do much more flying and floating than most other poultry like chickens or turkeys.
Because ducks are so much more active and need to fly, their muscles need extra energy to keep going. Which means they have a different sort of muscle in most of their bodies.
- Red meat is made of slow-twitch muscles which store oxygen for constant energy source. The protein myoglobin stores this oxygen and creates the darker pigment.
- White meat is made of fast-twitch muscles which take energy from glycogen, a carbohydrate.
The fat content in their skin helps them float, since ducks spend so much time in the water. This also explains why the fat is located in the skin, as a sort of natural pool floaty, rather than marbled through the meat as we see in beef cuts.
What does duck taste like?
Because duck meat is fatty and red, it tastes more like beef or lamb than chicken or turkey. There is a strong flavor of fat, and if the duck is wild there may be a gamey taste. Occasionally I get a duck that tastes a bit like liver. In a good way!
How do I store fresh duck?
Keep in its original packaging or an air-tight container in the fridge for up to 7 days before cooking.
You can also freeze it for 6 months!
Can I cook duck in advance?
Yes you can. Look below for more specific reheating advice.
Do remember the crisp will never be quite as good as the day you made it fresh. But you can get very close.
How do I know when my duck is cooked?
- Temperature – the USDA recommends cooking poultry to 170°F. But if you like medium-rare or rare meat, like me, cooking it to around 130-140°F keeps it in that range.
- No thermometer? Use the finger method! Place your thumb and pointer finger together and press the flesh at the base of your thumb. That’s rare. Thumb and middle finger? Medium-rare. Thumb and ring finger? Medium-well. Thumb and pinky? Well done.
How do I store cooked duck?
If I have a particularly fat piece of duck I struggle to finish it all in one go.
Simply put what’s left in an air-tight container and place it in the fridge. Be sure to eat it before the week is out!
How do I reheat cooked duck?
Take the duck out of the fridge and let it warm up for 10 minutes. Place it on a oven-safe dish and roast is covered with foil at 350°F for 10 minutes. Then uncover the duck and let it crisp for another 6-8 minutes. Timing will depend on the size of your meat. This is for half a duck breast.
You could put it in the oven for 15 minutes and then crisp the skin on the frying pan if there’s still a little fat left to render.
There is a toaster oven method as well, but I’ve never personally tried it.
Can I use duck fat? How do I store duck fat?
Yes! Absolutely! In fact, if you plan on keeping it, it’s wise to set up a clean empty soup can before you start cooking so you can pour the fat into it as you render.
Just like pork fat or bacon fat or even goose fat, it will chill in the fridge and become solid so you can store it in a jar for 6 months. You can also freeze it for about a year.
Use it just like a pat of butter: fry eggs, grill cheese, roast potatoes, even rub onto other birds. (It doesn’t go very well with sweet foods like sautéed pears or pancakes.)
Recipe: Simple Pan Seared Duck Breast
What sides to serve with duck?
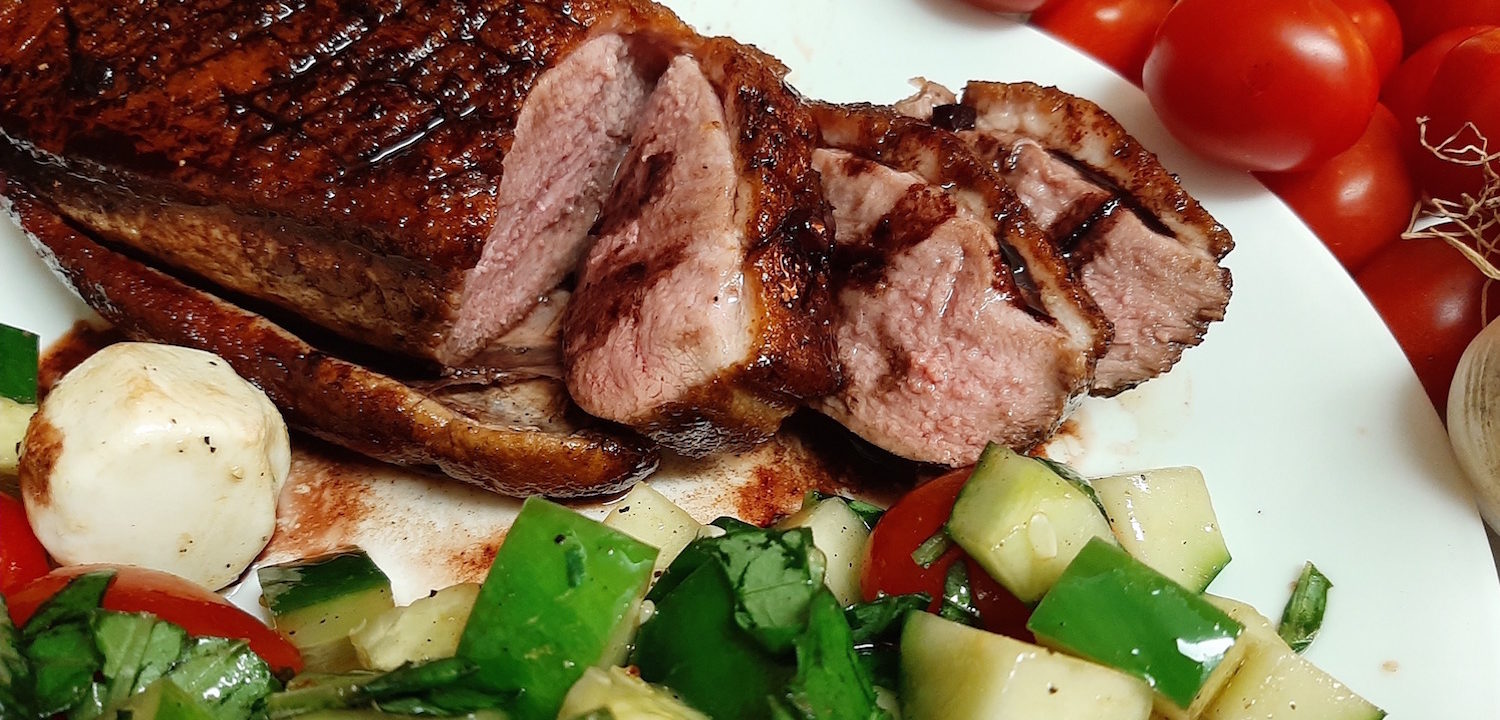
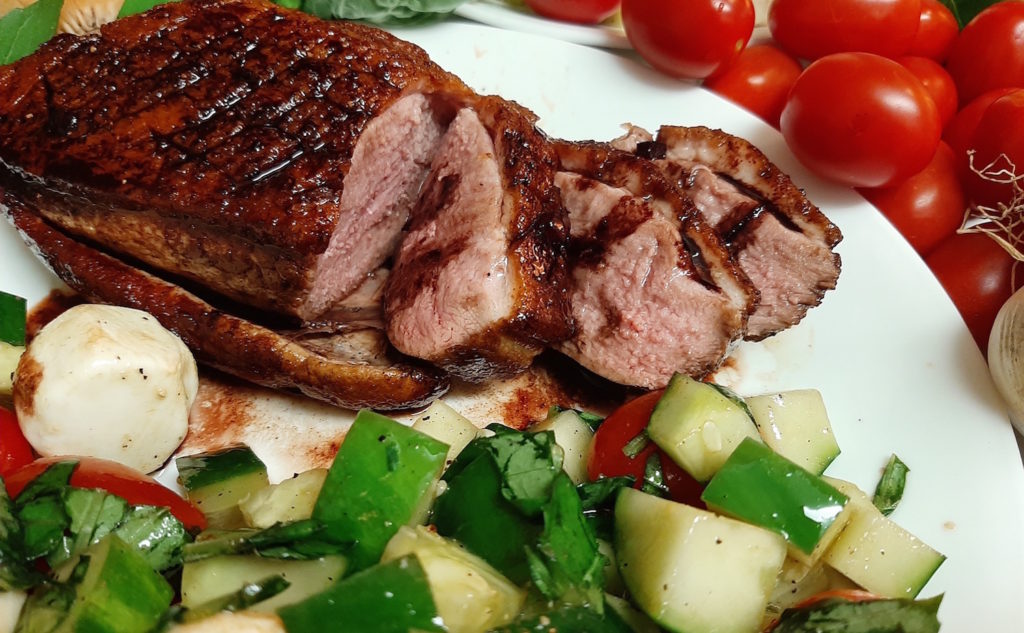
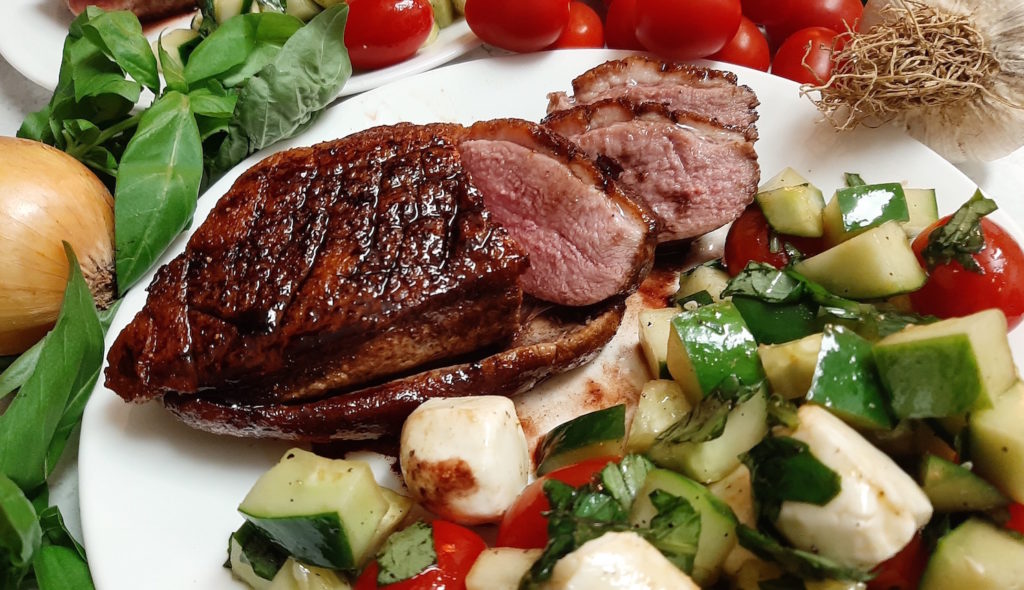
I’d forgotten to buy any vegetables the day we made this, so Vasiliy came to the rescue with a caprese salad idea. It was lovely, light and refreshing next to such a heavy duck meal!
Duck is fairly versatile and will pair with many of the same sides as both chicken and beef.
It tends not to go very well with creamy foods like carbonara because too much fat is overwhelming. Stick to bright vegetables or lighter pasta sides.
- Sautéed Green Beans with Garlicky Mushrooms
- Yogurt & Dill Green Beans
- Roasted Vegetables
- Roasted Carrots
- Watercress and Mandarin Orange Salad
Caprese Salad for Two
- 1 cup fresh Cherry Tomatoes
- 1 cup fresh cubed Cucumbers
- 2 tbsp sliced fresh Basil
- 2 tbsp Olive Oil
- 1 tbsp Balsamic Vinegar
- Salt, to taste
- Pepper, to taste
- Slice the cucumbers and basil.
- Combine all ingredients in a bowl.
- Let sit until ready to serve with the duck!
What wine pairs with duck?
Duck is quite heavy and fatty, so you need wines that can stand up to that flavor and cut through that fat.
- Red Wine: Pinot Noir
- White Wine: Gewurztraminer, Grüner Veltliner
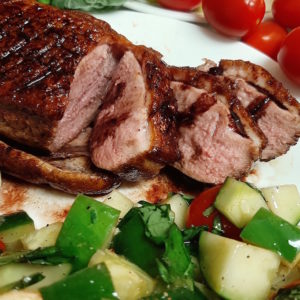
Surprisingly easy (and fancy) duck recipe that works equally well for late weeknights or weekend festivities!
- 2 Duck Breasts
- Salt to taste
- Fresh Ground Pepper to taste
- 1 small Shallot chopped
- 1 clove Garlic sliced or minced
- 1/4 cup Red Wine
- 1/4 cup Balsamic Vinegar
- 1 tbsp salted Butter
-
Remove the duck from the fridge. Wash it and pat dry.
-
Lay skin-side up on a cutting board. Score the skin and fat as described above.
-
Let sit for at least 10 minutes and up to 30 minutes.
-
Season on both sides with salt and pepper.
-
Place the duck, skin-side down, on to a cold pan. Turn the heat to medium-low. The cooking will start slowly as it heats up. After about 10 minutes you should hear gentle bubbling from the fat. If the fat is jumping around or spitting or cascading around the pan, turn the heat down. It should just be a gentle bubble.
-
Pour out the fat as it accumulates in the pan. (Remember not to just dump hot fat down the sink.)
-
After about 10-15 minutes the fat will be mostly rendered away and the skin will be a crispy brown. You can drizzle a little bit of fat over the flesh side. I usually do just before I flip it.
-
Pour out a bit more fat and flip the duck over to the flesh side. Raise the heat to medium. Cook for about 5 more minutes for rare, 7-10 more minutes if you want medium-rare. A little longer if you want well-done. (Why you would want well-done duck is beyond me, but please enjoy chewing endlessly on your stringy meat. Personally I think there are better ways to increase jaw strength.)
-
Remove duck from the heat. You can serve it as a whole breast or sliced. Let rest about 10 minutes before serving or slicing.
-
Chop the shallot and garlic.
-
Once the duck is removed from the pan, add these aromatics to the last little bit of duck fat. There should be no more than 2 tbsp of fat in the pan. Dump out the rest.
-
Let the aromatics cook for 2-3 minutes, stir occasionally.
-
Add in the wine to deglaze the pan. Cook for 1 minute.
-
Add in the balsamic vinegar and butter. Stir well.
-
Let simmer over medium heat until it reduces by half (about 5 minutes.)
-
Pour over duck slices and serve! (You may strain out the garlic and shallots or not. Totally up to you. We removed them this time.)


I tried this recipe, and it was perfect, but I have questions I want to ask; how can I reach you?